Summary :
Here come some questions: can I upgrade my Windows 10 to Windows 11? How do I upgrade from Windows 10 to Windows 11? In terms of Windows 11 update, it is possible as long as your machine meets some conditions and it is easy to upgrade Windows 10 to Windows 11.
Should I Upgrade to Windows 11?
Since the official release of Windows 11 on June 24, 2021, perhaps some users have installed the preview build of Windows 11 on their computers so that they can enjoy the brand new UI design and some improved & new features.
If you are also curious about this brand new operating system, you may want to install Windows 11 on your PC (currently Windows 10 is installed). Then, here comes a question: should you upgrade to Windows 11?
The answer is yes, most likely. This is because the new system brings a visual design, Android apps support, a new Microsoft Store, etc., better handles multitasking, improves gaming experience, and more when compared to Windows 10. To know more information on the differences between Windows 11 and 10, refer to this post – [6 Aspects] Windows 11 vs Windows 10: What Are the Differences.
Microsoft has officially announced Windows 11 in the What’s next for Windows event. In this post, we will show you what’s new in Windows 11.
Can You Upgrade Windows 10 to Windows 11?
To install Windows 11 on your PC, the machine should meet some requirements.
System Minimum Requirements
As a brand new operating system, Microsoft offers new system minimum requirements when compared with Windows 10. Refer to this post to know the differences – Windows 10 vs 11 Minimum System Requirements: Why Need a New One. From the official website, you know much information:
- Storage: 64 GB or larger storage device
- RAM: 4GB memory
- Processor: 1 gigahertz (GHz) or faster with 2 or more cores on a compatible 64-bit processor or System on a Chip (SoC)
- Graphics card: Compatible with DirectX 12 or later with WDDM 2.0 driver
- System firmware: UEFI, Secure Boot capable
- Display: High definition (720p) display that is greater than 9” diagonally, 8 bits per color channel
- TPM: Trusted Platform Module (TPM) version 2.0
- Internet connection: Microsoft account and internet connectivity required for setup for Windows 11 Home

If you need to update Windows 10 to Windows 11, make sure your PC meets these requirements. Besides, make sure your device has a TPM version 2.0 that is enabled and Secure Boot is also enabled.
How to check if your PC has TPM for Windows 10? If so, how to enable TPM in Windows 10 or BIOS? Look for ways in this post now.
Check PC Compatibility for Windows 11
To quick know if your PC can run Windows 11, you can perform a compatibility check. Microsoft offers you a professional compatibility tool called PC Health Check to help you see if your PC meets the requirements to run Windows 11. Refer to this post- Check Computer Compatibility for Windows 11 by PC Health Check to know how to use it.
Or you can use a PC Health Check alternative like WhyNotWin11 or Win11SysCheck to perform Windows 11 compatibility test. Just go to download WhyNotWin11 from the GitHub website, double-click the executable file to launch this app and you can see many details on whether the PC is compatible with Windows 11.
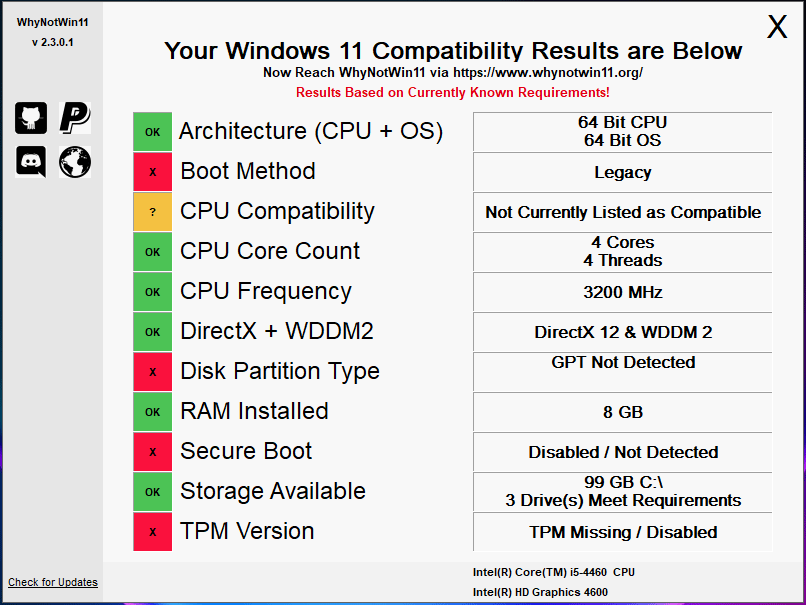
How to check if your PC can run Windows 11? You can use a professional Windows 11 compatibility checker to test your PC.
If your PC meets all the conditions of Windows 11, you can upgrade Windows 10 to Windows 11. Microsoft allows you to update to Windows 11 for free. Just follow the step-by-step guide below to easily finish Windows 11 update task.
How to Upgrade Windows 10 to Windows 11 for Free?
Create a Backup Before Windows 11 Update
When performing a Windows 11 update, there are some things you should get ready for, for example, be ready for Windows 11 mentally, create a backup, etc. Refer to this post to know more – Get Ready for Windows 11: What to be Aware of & What to Do. Most important of all, it is necessary to back up your important files or create a system image in advance.
As stated above, Windows 11 is not reliable currently since it is in the test stage. Some unknown issues may happen, for instance, file deletion, some bugs on Taskbar, Search, Settings, etc., system crash, and more.
PC backup is important. You can restore your computer to the previous state using a backup in case of file loss or system breakdown. Besides, if you want to roll back to Windows 10 after 10 days, you can also ask the PC system backup for help.

How to uninstall Windows 11? How to go back to Windows 10? Here are 3 methods for your reference!
How to back up your computer in Windows 11? This new OS allows backing up files to OneDrive but OneDrive offers only 5GB free space and it doesn’t support system backup. To back up your computer well, we recommend backing up your computer to an external hard drive or USB flash drive using MiniTool ShadowMaker.
As a professional and free computer backup software, MiniTool ShadowMaker can help to back up files & folders, create a system image, clone disk, sync files, and more. It is compatible with Windows 10/8/8.1/7. Now get its trial edition by clicking the following download button and install it on your Windows 10.
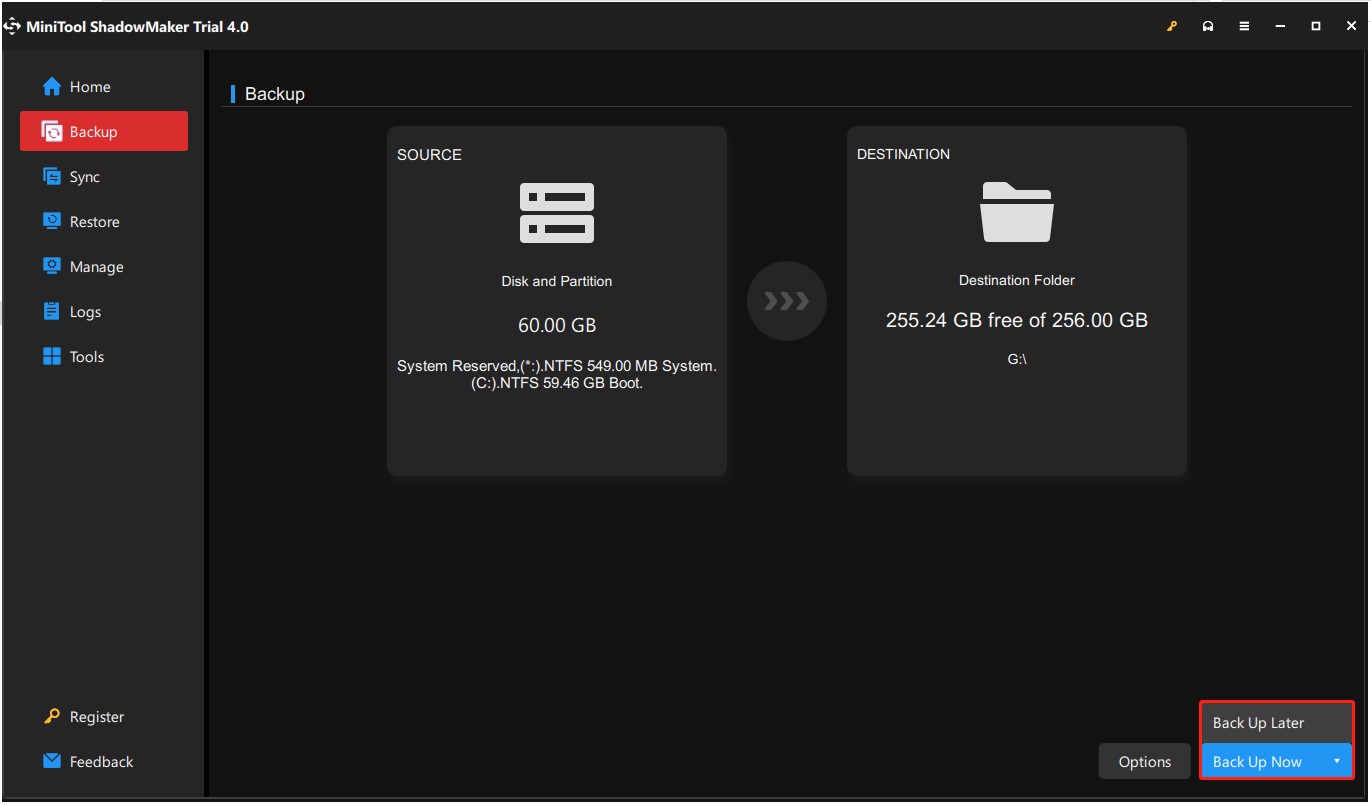
How to back up your PC before starting updating Windows 10 to Windows 11:
1. Double-click the icon of MiniTool ShadowMaker to launch it to its main interface.
2. When going to the Backup tab, you can see this software backs up the system by default. You only need to choose a destination to store the system image.
If you need to back up files, go to Source to choose items that you want to back up and go to Destination to select a storage path.
3. Click Back up Now to start backing up immediately.
Next, it is time to upgrade Windows 10 to Windows 11. Currently, there are two ways for you to free install Windows 11 on your device.
Free Update Windows 10 to Windows 11 via Windows Insider Program
If you are running the system earlier Windows 10, version 2004, you can install Windows 11 via Windows Insider Program. Not all the versions of Windows 10 support Windows 11 update via Windows Insider Program.
Here is what you should do:
Step 1: Join Windows Insider Program
Make sure you are a member of Windows Insider Program. If you don’t know how to become an insider, refer to this post to know much information – How to Join the Windows Insider Program to Be a Windows Insider.
Step 2: Download and Install Windows 11 Preview Build like 22000
- In Windows 10, open the Settings app by pressing the Win + I keys on the keyboard.
- Navigate to Update & Security > Windows Update.
If there are updates that are available, Windows will start checking for updates automatically and then download & install on your computer. After downloading, Windows needs to restart several times to finish the installation.
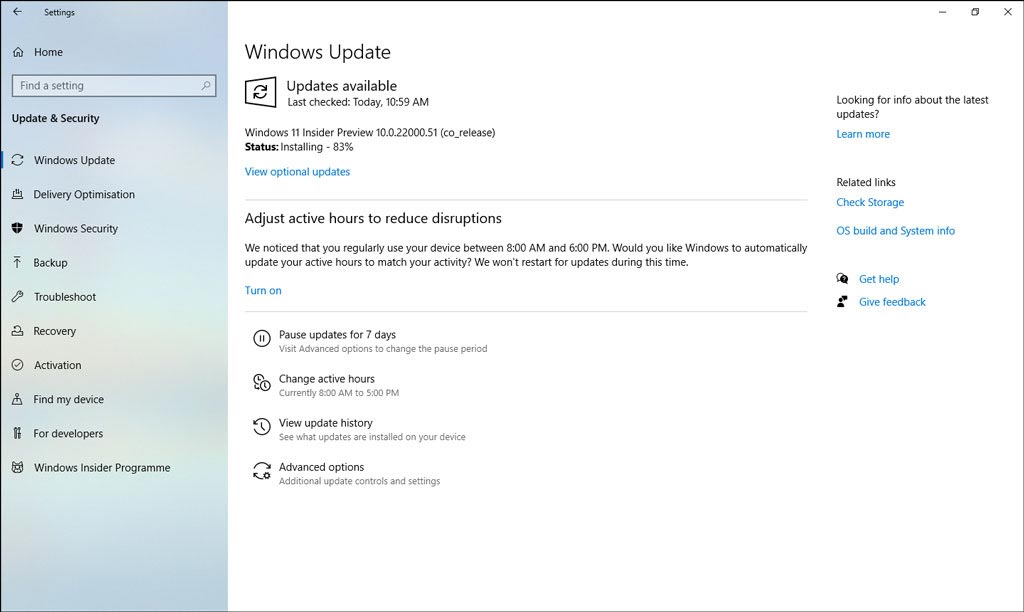
This is the simplest way to upgrade to Windows 11 from Windows 10 and it is worth recommending.
Upgrade Windows 10 to Windows 11 via Installation Assistant
If your PC have installed Windows 10, version 2004 or higher, you can upgrade to Windows 11 via the tool called Windows 11 Installation Assistant. Besides, you should have a Windows 10 license.
1. Go to go to the Microsoft website and click Download Now from the Windows 11 Installation Assistant section.
2. Run this tool with admin rights.
3. If the the device hardware is compatible, accept the license terms.
4. Click the Restart Now button to complete the installation on your PC. This will take some time to install Windows 11.
In this post – How to Get Windows 11 Final Version? Download & Install It, you can find some useful details.
Upgrade Windows 10 to Windows 11 via an ISO File
Here is another way for you to perform a Windows 11 update from Windows 10 and that is to use an ISO file of Windows 11. If the above way fails to work, you can try this way.
Step 1: First of all, you need to prepare an ISO file for Windows 11.
1. To get Windows 11 ISO file, you can go to the Microsoft website.
2. Under the Download Windows 11 Disk Image (ISO) section, choose Windows 11 and click Download.
3. Choose a language to continue.
4. Click the 64-bit Download button to get the ISO file of this new OS.

Step 2: You can create a bootable USB flash drive.
If you have a CD/DVD, you can burn the ISO file to it. Or if you have a USB drive, it is easy to make a bootable drive. Here, take a USB drive as an example.
- Go to download Rufus from its official website.
- Launch this app on your Windows 10 PC. Then, select the USB drive you have connected to the machine, choose Partition scheme, Target system, and more.
- Click the START button to start creating a bootable USB flash drive.
Step 3: Install Windows 11 from the bootable USB flash drive.
To upgrade Windows 10 to Windows 11, you can boot the PC from the created USB drive and run an installation. Just restart Windows 10, press a specific key to enter BIOS, change the boot order and run the PC to the Windows Setup interface. Now, start Windows 11 installation.
1. Choose a language, time format, and keyboard method for Windows 11. Click Next to continue.
2. Click Install now to go on.

3. After a while, click I don’t have a product key.
4. Accept the license terms and click Next to continue.
5. There are two types of installation for you. To upgrade Windows 10 to Windows 11, you can click the first option to install Windows and keep files, settings, and applications. If you want to perform a clean install, you can click Custom: Install Windows only (advanced).
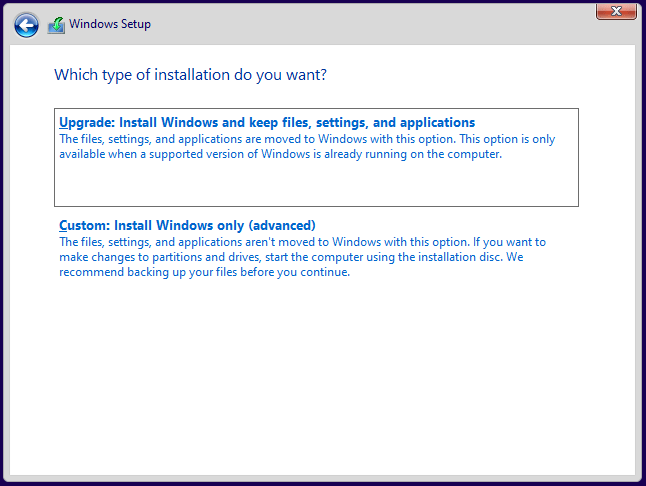
6. Finish the Windows 10 update/installation by following the on-screen prompts.
If you want to install Windows 11 from USB, how can you do this task? It is an easy thing if you follow the complete step-by-step guide in this post.
Update to Windows 11 Without TPM
In the above parts, we have shown you how to update Windows 10 to Windows 11 when the PC meets the update conditions of Windows 11. If your PC doesn’t meet the requirement of TPM, you can still update to Windows 11 without TPM.
1. When using the bootable USB drive to perform Windows 11 update, you may receive the error message “This PC can’t run Windows 11”. Just press Shift + F10 to launch the Command Prompt in the Windows Setup interface.
2. Type regedit and click OK to get Windows Registry Editor.
3. Go to HKEY_LOCAL_MACHINE\SYSTEM\Setup, right-click the Setup folder and choose New > Key. Name it LabConfig.
4. Right-click on LabConfig and choose New > DWORD (32-bit) Value. Name the key as BypassTPMCheck and double-click it to set the value data to 1.
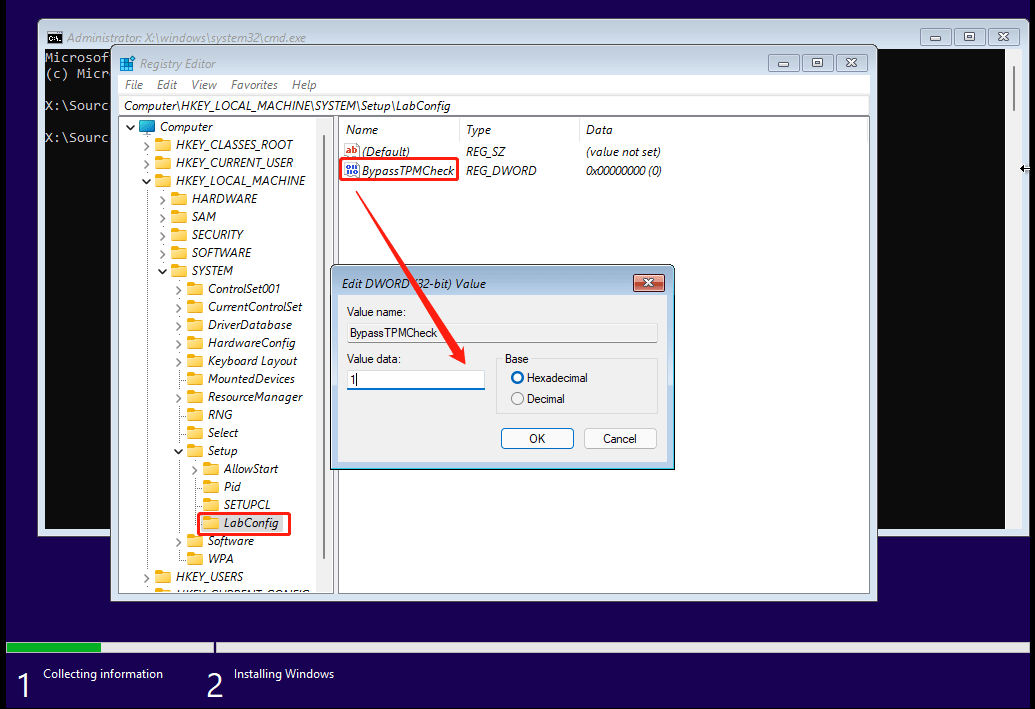
5. Create another DWORD key called BypassSecureBootCheck and also set its value data to 1.
6. Exit Registry Editor and Command Prompt. Then, you can complete the Windows 11 installation as normal.
Bottom Line
How can you upgrade Windows 10 to Windows 11 for free? After reading this post, you know much information. Just perform a Windows 11 compatibility check and then follow one way to update to Windows 11 if the PC meets the requirements of this new operating system. Note that you should create a backup before the update to restore the PC in case of system update issues.


 WhatsApp us